June 26, 2016
One of the hardest things about growing tree fruit is thinning it. It goes against ones nature to grow a tree and put all that time and effort in just to pull off fruit before it is ready to eat. It is also one of the more important aspects to growing Quality Fruit. We usually will thin a little when apples are about nickel size and then wait for the “June Drop”. June fruit drop refers to the natural tendency of fruit trees to shed some of their immature fruits. Fruit trees will set more flowers than they need for a crop to offset losses from weather or other cultural factors. According to Purdue University Consumer Horticulture, “Only one bloom in 20 is needed for a good crop on a full-blossoming apple tree.”
What Causes June Fruit Drop?
Fruit trees set fruit so that they can produce seed. Too large a crop will strain the tree’s resources and result in smaller fruits, possibly of lesser quality. So the tree protects itself and its seed by thinning the crop, once it senses weather and growing conditions are stabile. We have found that mother nature still leaves way to many apples on the tree so we must go through and manually thin the crop, hand picking into 5 gallon buckets. We like to do this when they are smaller than a golf ball. By collecting the fruit instead of leaving it on the ground, we help to break the life cycle of fruit damaging insects and pest. This is one part to IPM or Integrated Pest Management.
Why Thin The Fruit?
- 1.Bigger Fruit Less fruit means that those that are left will develop to be bigger
- 2. Better Fruit By thinning you will increase the sugars (brix level) and have more nutrient dense produce
- Annual Bearing Many trees will become biennial bearing if allowed to carry a big fruit load. Big crop now then no crop next year. It is natures way of achieving balance.
- Health of the Tree. Many branches cannot take the weight of a fully developed apple load, especially the tip bearers which have fruit primarily on the ends of the branches
Here is a picture of a young apple that would have snapped off branches if it were not supported
While this tree is not overloaded look at the support required!

Matt Scott-Joynt/M and Y Newsgency Ltd 23/09/13: Paul Barnett (40) examines one of the two hundred and fifty different varieties of apple that grow on an apple tree in his garden in Chidham, near Chichester in West Sussex. Paul has been grafting different kinds of apple onto the tree since 1989.
Thinning is as much an art as it is a science. Start by removing the smallest, misshapen, bruised or those with pest damage. Apples grow in a cluster of 4-5 which should normally be thinned to 1 or 2. As a rule of thumb it takes 40-50 leaves to support 1 apple.
March 17, 2016
Figs are one of the easiest plants to propagate from dormant cuttings. By this method of cloning you will get a plant that is an exact copy of the “mother” plant, unlike seeds which will have probably cross pollinated and give you almost unlimited variety. Seed grown fruits are usually inferior to either of the parents. Below are the steps we use to reproduce these tasty fruiting plants.
- Select cuttings from a dormant plant ( one in which the leaves have dropped and is hardwood)
- Most likely the cuttings will already have been exposed to sufficient chill hours to come out of dormancy. Chill hours are calculated by adding up the number of hours the temperatures is between 32 and 45 degrees Fahrenheit. Chill hours interrupt growth hormones and make it possible for a tree to enter dormancy. Figs only require 100-200 hours. If unsure put cuttings in a sealed baggie and put in your refrigerator for 2 weeks.
- When ready to start growth, trim the cuttings and make sure they are about 6-8″ long, at least pencil thickness or greater and have at least 4 buds.
- Rinse cuttings under running water for a few seconds to wash off any bacteria or mold spores, no scrubbing, just a quick rinse.
- Take the cuttings and cut the bottom at a 45 degree angle. This exposes more cambium for better rooting. If you have cut off the top or terminal end (end of a branch) cover this cut with normal Elmer’s glue to seal and prevent moisture loss. At this point you can dip the cut (bottom) end in rooting hormone, but we have not seem any difference using it.
- Prepare cuttings by wrapping the cuttings into a bundle with a damp, not wet, paper towel. Wrap the bottom but leave the top bud unwrapped.
- Do not let the wife see you using her kitchen utensils or dining room table.
- Now that cuttings are wrapped, put into a 1 gal zip lock bag and place in a warm spot such as the top of a refrigerator.

Fig Cuttings wrapped in damp paper towel in zip lock bag
- Check the cuttings once or twice a week to see how rooting is progressing. At first you will see little white bumps, this is where roots will first appear. Most of these bumps disappear when exposed to a dryer environment.
- When the roots have gotten 3/4 – 1″ long, usually 2-3 weeks depending on temperature, it is time to pot them up. They will have stem and leaf growth very apparent at this time.

Root initials and shoots forming

Close-up of new roots and shoot development
The best way to grow is using the small disposable plastic cups that people buy for parties. SOLO brand 18 oz. cups are the perfect ones. Any container will do but these allow you to see and monitor the root growth. Make sure to drill 4-5 holes for drainage in the bottom of the cup. The cutting can store a huge amount of carbohydrates which means a fig can grow stems and leaves and look great without having any or enough roots to support itself in a dry environment.
- We use 100% perlite but a mix with peat or a good sterile potting mix will work. perlite holds moisture and is sterile, but also allows better root viewing in the cup.
- Do not let your wife catch you potting these on the dining room table!
- Place the cuttings in the cup with at least 2 buds below the soil line and 2 above it. Pinch off any shoots or green growth that will be below the soil line. We want all the energy to be focused on top growth. Don’t worry about any roots above the soil line as these will dry up and disappear in a few days.
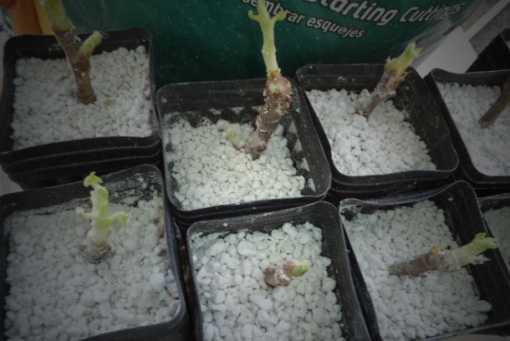
Pot up cuttings into perlite
- Because we have gone from 100% humidity to much less we need to hold in moisture and gradually harden the plant off as it develops enough roots to keep up with transpiration. We use a smaller disposable cup in our containers to cover the cutting like a mini greenhouse. A plastic sandwich bag also works well. Make sure to keep the cups well watered.

Cover the newly planted cuttings to hold in humidity
- Place the plants in a warm location out of direct light. Direct light will overheat them. Every 2-3 days take the cover off to give fresh air and reduce any possibility of fungus or molds developing. After about 2 weeks they can be watered with a weak solution of fertilizer (1/3 – 1/2 strength) every third watering.

Fig cuttings growing with humidity cover no longer needed
- Depending on temperature most will have enough roots to sustain themselves after a month and can now be potted up to a 1 gal container. We use 1 gallon size since it holds more media and will stay damp evenly for longer than a smaller size. The ones that have not developed will need to be kept longer in the cups until roots develop.
- Keep well watered and start exposing them to filtered sunlight gradually moving up full light.
- Now you are in the fig business and ready to grow on or give to friends!

